webpack的HRM是如何实现的?
很久之前写过一篇Live Server的实现 从webpack-dev-server看Dev Server功能设计, 里面讲到了到开发服务器serve一个index.html后是如何动态刷新页面的:
- 在目标index.html中注入client websocket代码, 并且服务端开始监听websocket连接
- 监听本地文件改动, 如果改动则给client发消息重新刷新页面
这种Live Server机制对于现在SPA应用调试是极其不方便的:
- 一刷新状态全丢
- 效率低, 组件重新加载
对于SPA调试的解决方案是Hot Module Replacement, 指当你对代码修改并保存后,webpack将会对代码进行得新打包,并将新的模块发送到浏览器端,浏览器用新的模块替换掉旧的模块,以实现在不刷新浏览器的前提下更新页面。
下面跟随本篇文章实现一个轻量级的HMR解决方案。
HMR更新流程
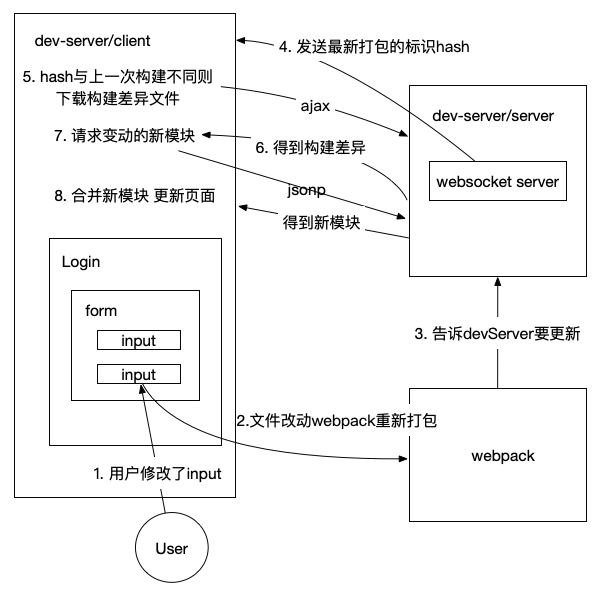
模型中总共有4个对象, webpack, devServer/client, devServer/server, 和用户的App, 一次热更新的流程在图中已经标记的很明显, 那么这4个对象是如何连接起来的?
- devServer/server通过在webpack上配置钩子, 使webpack每次编译后通知devServer/server.
- devServer/server与devServer/client是通过websocket建立连接接收构建hash码, devServer/client通过ajax发送get请求获取差异文件, 通过jsonp获取最新构建的模块文件
- 在用户App中注册一个挂在window的全局方法, 当devServer/client新模块后会调用用户在window上注册的全局方法进行更新.
从0到1实现HMR更新流程
实现服务端流程
首先用express写个http服务器, 来serve用户的index.html, 为了效率更好, 使用内存文件系统, 也就是将webpack构建结果输出到内存.
let app = new express();
const MemoryFileSystem = require('memory-fs');
const fs = new MemoryFileSystem();;

// 写个中间件来serve用户的index.html
const devMiddleware = (req,res,next)=>{
    if(req.url === '/favicon.ico'){
        return res.sendStatus(404);
    }
    let filename = path.join(config.output.path,req.url.slice(1));
    console.error(filename);
    if(fs.statSync(filename).isFile()){
        let content = fs.readFileSync(filename);
        res.header('Content-Type',mime.getType(filename));
        res.send(content);
    }else{
        next();
    }
}

app.use(devMiddleware).listen(port)

// 并且与client建立socket连接, 传第一次构建的hash
let io = require('socket.io')(this.server);
io.on('connection',(socket)=>{
    sockets.push(socket);
    if(lastHash){
        socket.emit('hash',lastHash);
        socket.emit('ok');
    }
});
客户端和服务端的连接到此建立完毕, 下面开始走热更新的流程
const complier = webpack(config);

// 流程 1 2: 开启webpack监听文件改动 若改动则编译
compiler.watch(config.watchOptions||{}, (err)=>{
    console.log('用户修改了文件 启动编译');
});


// 流程 3: 通过挂钩子, 让webpack在编译完成后通知devServer/client
complier.hooks.done.tap('dev-server', (stats)=>{
  // 流程 4: devServer/server向devServer/client发送最新构建hash
  socket.emit('hash', stats.hash)
  // 再向服务器发送一个ok
  socket.emit('ok');
})
客户端的流程
客户端的流程要复杂一点, 涉及2次请求, 为什么是2次请求?因为webpack在每次构建时生成2个patch, 1个是hash.update.json, 用来记录改动的模块, 另一个是hash.update.js也就是最新的模块代码
// devServer/client 收到hash和ok后开始比对hash
socket.on('hash', hash=>{
  currentHash = hash
})

socket.on('ok', ()=>{
    // 流程 5: 对比hash 如果没变化就是第一次加载
   if(!lasHash || lastHash == currentHash){
     return lashHash = currentHash
   }

   // 流程 6: 有变化 开始下载差异文件
    hotDownloadMainfest().then(update=>{
    /**
    * c: {} 哪些文件改变
    * h:  hash值
    */
    let chunkIds = Object.keys(update.c);
    chunkIds.forEach(chunkId=>{
      // 流程 7:根据差异文件 去下载最新编译的模块f
      hotDownloadUpdateChunk(chunkId);
    })
  })
})

// 去问服务器找2次编译的差异 也就是ajax请求 hot-update.json
function hotDownloadMainfest(){
  return new Promise((resolve, reject)=>{
    let reuest = new XMLHttpRequest();
    let requestPath = '/' + lastHash + '.hot-update.json'
    request.open('get', requestPath, true);
    request.send()
    request.onreadystatechange = function(){
      if(request.readState === 4){
        let update = JSON.parse(request.responseText);
        resolve(update);
      }
    }
  })
}

// jsonp请求差异模块
function hotDownloadUpdateChunk(chunkId){
  let script = document.createElement('script');
  script.charset = 'utf-8';
  script.src= '/' + chunkId + '.' + lastHash + '.hot-update.js';
  document.head.appendChild(script)
}
接下来就是复杂的部分, 也就是最后一个流程, 合并下载回来最新模块, 并且更新用户的App, 合并代码的流程为:
- 使用新模块替换已注册的模块
- 执行用户注册的热更新
jsonp拉回来的代码会调用webpackHotUpdate, 我们先实现webpackHotUpdate
window.webpackHotUpdate = (chunkId, moreModules)=>{
  for(let moduleId in moreModules){
    let oldModule =  __webpack_require__.c[moduleId];
    let {parents,children} = oldModule;

    // 替换老的模块
    var module = __webpack_require__.c[moduleId] = {
          i: moduleId,
          l: false,exports: {},
          parents,children,
          hot: window.hotCreateModule(moduleId)
     };
     // 加载新模块
     moreModules[moduleId].call(module.exports, module, module.exports,__webpack_require__);
     module.l = true;

     // 热更新
    parents.forEach(parent=>{
      let parentModule = __webpack_require__.c[parent];
      parentModule.hot&&parentModule.hot._acceptedDependencies[moduleId]&&parentModule.hot._acceptedDependencies[moduleId]();
    });

    // 更新完毕 更新hash
    hotCurrentHash = currentHash;
  }
}

function hotCreateModule(moduleId) {
  var hot = {
      _acceptedDependencies: {},
      accept: function(dep, callback) {
        for (var i = 0; i < dep.length; i++){
          hot._acceptedDependencies[dep[i]] = callback;
        }
      }
  }
  return hot;
}
上面代码先从__webpack_require__.c中拿到parents和children,每个模块都有parents和children的属性, parents代表谁依赖了该模块, children代表该模块依赖了谁, 因为我们在合并完代码后需要让parents更新,拿到最新的代码.
使用新模块覆盖老模块的时候多了3个属性: parents, children和hot是用来热更新的, hot是一个对象, 其中最重要的是accept函数, 用户在App中注册热更新时候使用, 比如:
if(module.hot){
  // 用户注册热更新, 当title文件变化 调用render
  module.hot.accept(['./title'], render)
}
当用户在App中调用module.hot.accept进行注册的话, webpack构建这个模块时候就会多parents, children和hot 3个属性, 当新模块合并并且加载后, 会检查parents是否使用 accept注册了热更新, 如果注册了则运行用户的热更新回调。
在react中的应用
在webpack的配置文件中设置devServer的hot: true, 并且添加new webpack.HotModuleReplacementPlugin()就开启HMR支持了, 只需要在React App里面注册更新逻辑就可以享受HMR带来的便利了.
module.hot.accept('./app', render(App)
这种方案对于使用Redux作为状态管理的应用比较友好, 因为当重新加载后页面的状态会丢失, 我们可以将store放在localStorage或者window上来恢复重新挂载组件的状态, 但是对于状态存储于自身的组件, 还是会丢失状态, 那该如何解决呢? 使用 react-hot-loader, loader这个叫法在webpack中很奇怪, 通常在构建工具中loader被称作transform. 配置react-hot-loader需要2个步骤
- webpack.config的entry中间添加
react-hot-loader/patch - 并在loader中添加
react-hot-loader/webpack
有可能遇到的问题:
-
浏览器console提示HRM, 但页面没更新 可能babel把模块转成es6导致webpack没识别, 在.babelrc中设置
modules": false -
HOC包裹组件无法更新 在.babelrc中添加plugin:
react-hot-loader/babel -
reducer修改无更新 给redcuer也支持HMR
module.hot.accept('./reducer', () => store.replaceReducer(reducer))
总结
本文配合webpack实现了一个HMR的更新方案, 但是在react这种携带状态的应用开发中还是存在一定的缺陷, 需要使用类似react-hot-loader这样的解决方案, 但react-hot-loader也并不是一个成熟的方案直到3.0发布之前, react-hot-loader的原理就是通过代理组件, 不让HMR进行更新, 而是通过自己来更新保持组件的状态. 关键实现依赖react-proxy和react-deep-force-update都是Dan写的, create tools for humans, 向Dan学习.